
Get 93% OFF on Lifetime
Exclusive Deal
Don’t miss out this deal, it comes with Password Manager FREE of cost.
Get 93% off on FastestVPN and avail PassHulk Password Manager FREE
Get This Deal Now!By Nancy William No Comments 8 minutes
This guide will show you how to get Kodi subtitles using opensubtitles.org and subscene.com! There are times when some streaming services come without proper audio quality. It can completely ruin the whole streaming experience if you can’t hear dialogues currently or can’t understand the language. This is where subtitles come in. Adding Kodi subtitles allow you to enjoy all your content! The tutorials highlighted below support Kodi 19 Matrix, KODI 18.4 Leia, and lower, which work on Firestick, Windows, Android, mac, Nvidia Shield and more!
By enabling subtitles on Kodi through its addons, you’ll get the best streaming experience! With that, you’ll be able to watch all the popular TV shows and movies even if they’re in different languages.
When it comes to subtitles for digital streaming devices, nothing can compare to OpenSubtitles. This service boasts subtitles from an extensive list of languages and covers mostly all of the TV shows and movies that have been released in the past decade. Before we help you access these subtitles, it is very important to understand data privacy issues.
All of your streaming activity can be logged and accessed by ISPs and other agencies. If you want to protect your data, then consider using a VPN. FastestVPN has a zero data-logging policy and uses military-grade AES 256-bit encryption to protect all of your data from hackers. They also offer multiple servers, which will allow you to access geo-restricted content and improve your overall browsing experience by a substantial margin.
Once you have FastestVPN ready to go, you can now move on to the following steps to get subtitles using OpenSubtitles.
The very first step of this process is registering your account with OpenSubtitles. Follow this link https://www.opensubtitles.org and register your account. The on-screen instructions will guide you and help you create a username and password. Hit okay, once you have entered all of the required details.

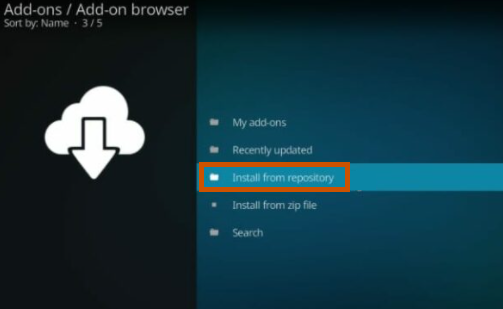
After you create an account, the next step is to launch your Kodi device and click on add-ons. You will see an icon with an open box called a package installer, click on that, and finally click on “Install from repository.”
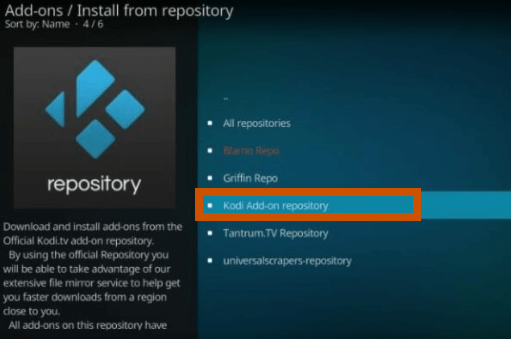
By now you should have a drop-down list in front of you, from this list find the “Kodi add-on repository.” This will expand your list and provide you with a lot of different options. From that list find the folder subtitles and then click on it.
After you click on subtitles, you will need to look for OpenSubtitles.org from your list and then click on the “Install” button located on the lower right-hand corner of your screen.
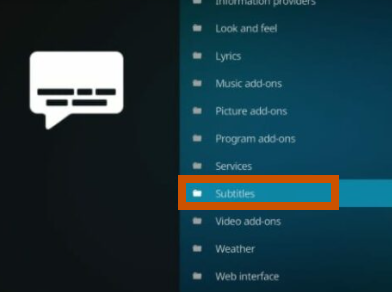
You will need to wait till you get a notification stating that Opensubtitles.org addon has been installed.
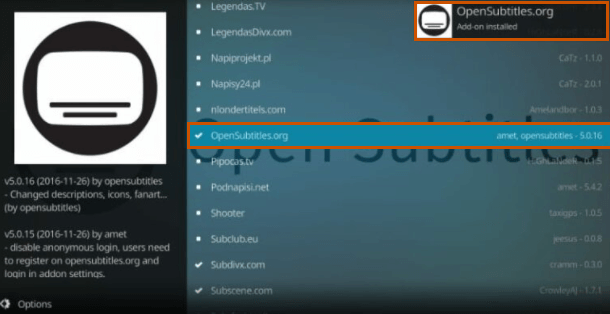
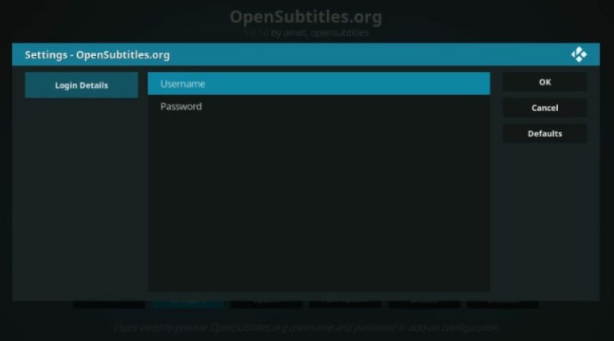
Okay by now you should have gotten a notification stating that the installation is complete. Now you will have to click on opensubtitles.org again and click on the configure icon to open a dialogue box.
You will now need to enter your username and password which you previously created when registering your OpenSubtitles account. After you have entered all of the required details, hit enter and move on to the next step.
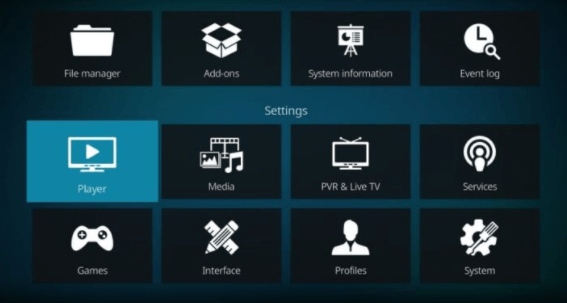
Now from your home screen, you will need to click on the Settings icon and open “Player” settings. Now, next to the cog icon, you will see an icon for basic, click on that to change it to standard. Now select the language option which should be located on the left-hand side of your window.
Okay after you click on languages, a drop-down menu should have opened up in front of you. From that menu, click on languages to download subtitles. Choose your preferred language for Kodi then click on Default TV show service in order to set up subtitles for your favorite TV shows.
Once you click on more, a list of subtitles will show up in the drop-down menu. Again you will need to find OpenSubtitles.org and download the file. Once the download finishes, click on OpenSubtitles.org and start the installation process.
You will need to repeat step 9 by opening your default movie service and choose opensubstitles.org. Make sure you confirm the changes you have just made by clicking on okay or it will reset back to its original settings.
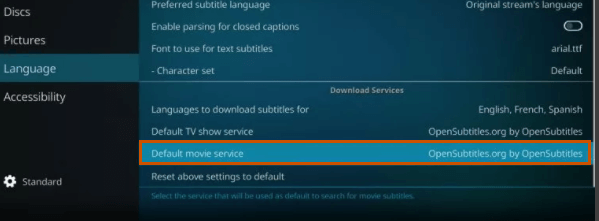
Finally, if you go to your settings and click on language a drop-down menu should show up. As you can see from your screen both your default movie service and default TV services are now being powered by Opensubtitles.org. These steps mentioned above have been designed with meticulous attention and we are sure that by now, you should be able to enjoy all of your favorite movies and TV shows with subtitles. However, if you still cannot see subtitles while playing movies or TV shows, then there is a chance that your subtitles have not been enabled in the add-on section.
As mentioned before, if you are still facing issues and cannot see subtitles while streaming, then all you need to do is enable subtitles from the add-on settings For this guide we’ve used Exodus Redux. However, you could use the same steps for any addon you’d like:
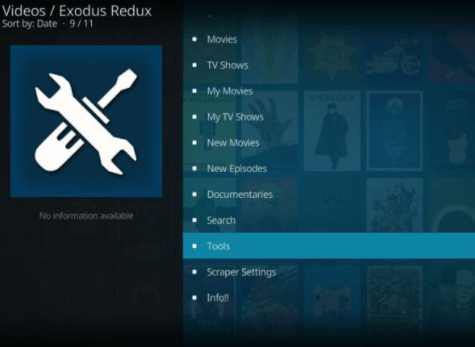
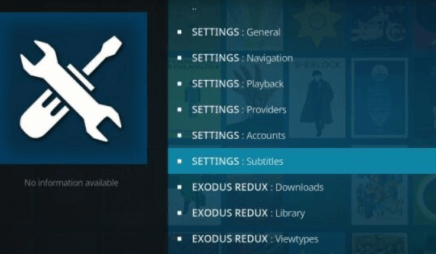
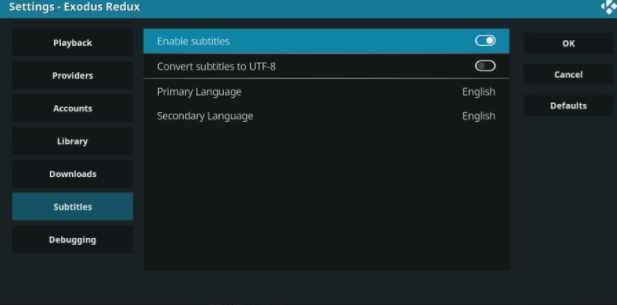
Voila! you now have subtitles enabled for Kodi and can enjoy thousands of movies and TV shows with subtitles. If you are short on time and want to skip some of the steps mentioned above then you can also get subtitles without registering your account.
Okay so for all the people out there who want to get subtitles on Kodi without the hassle of creating and registering an account, you can use Subscene Kodi subtitle service. Subscene Kodi will not provide you with the same number of options such as OpenSubtitles but it can get the job done fairly well.
There you go, that’s all you need to do in order to activate Subscene.com on your Kodi device. Although they boast an extensive list of subtitles, you may come across many shows and movies without subtitles. You can only overcome this by registering with OpenSubtitles.org.
If you want to turn off Kodi subtitles by default, here’s how:
By now you should have understood the two most common methods people use to get subtitles on Kodi. Both OpenSubtitles and Subscene are considered to be the most renowned service providers in the market today. We can guarantee that by now your subtitles should be activated on your Kodi device.
However, you might face issues with the subtitles being out of sync with the movie or TV show that you are playing. Don’t worry, you can easily fix this by offsetting the subtitles by either delaying it or advancing it. This issue is most common with new content, however with a few tweaks, it should work perfectly with your favorite TV shows and movies.
Please remember to use a VPN service in order to protect all of your data and access geo-restricted content. Subscribe to FastestVPN before you follow the steps mentioned above. With FastestVPN, you can setup VPN directly in the router so that every device, including your Kodi device, has access to VPN protection.
© Copyright 2025 Fastest VPN - All Rights Reserved.


Don’t miss out this deal, it comes with Password Manager FREE of cost.
This website uses cookies so that we can provide you with the best user experience possible. Cookie information is stored in your browser and performs functions such as recognising you when you return to our website and helping our team to understand which sections of the website you find most interesting and useful.
Strictly Necessary Cookie should be enabled at all times so that we can save your preferences for cookie settings.
If you disable this cookie, we will not be able to save your preferences. This means that every time you visit this website you will need to enable or disable cookies again.