

Get 93% OFF on Lifetime
Exclusive Deal
Don’t miss out this deal, it comes with Password Manager FREE of cost.
Get 93% off on FastestVPN and avail PassHulk Password Manager FREE
Get This Deal Now!By Christine Margret No Comments 7 minutes
Learn how to Setup Static IP Address! A static IP address is a powerful tool for improving remote access and boosting network security. Unlike dynamic IPs, which can change frequently, a static IP remains constant, making it easier to manage and secure your network. Configuring a static IP address is straightforward across various operating systems. In this guide, we will walk you through setting up a static IP address on popular systems and through your router, ensuring you have a stable and secure network connection.

A static IP address is a fixed, unchanging address assigned to a device on a network, unlike dynamic IP addresses that can change periodically. With a static IP, you can designate specific addresses for frequently used devices, such as assigning one for your home server or main desktop. This makes remembering and managing devices easier since their addresses remain consistent.
You can set a static IP address directly on each device through its network settings or configure it through your router. This process is often called a DHCP reservation when done through the router. This method allows the router to automatically assign the reserved IP address to the device whenever it connects while it continues using DHCP settings. This setup ensures that the IP addresses stay the same without manual reconfiguration.
A static IP address offers several key advantages. Here are some of the reasons to use a Static IP address:
Setting a static IP address can help prevent network conflicts and ensure stable connections for your devices. While most home networks operate fine with dynamic IP addresses, setting a static IP is useful for certain configurations and requires a basic understanding of TCP/IP. Here’s a step-by-step guide on how to configure a static IP address on a Windows device:
1.Open Network Settings:
2. Choose the Network Adapter:
3. Access Properties:
4. Configure IPv4 Settings:
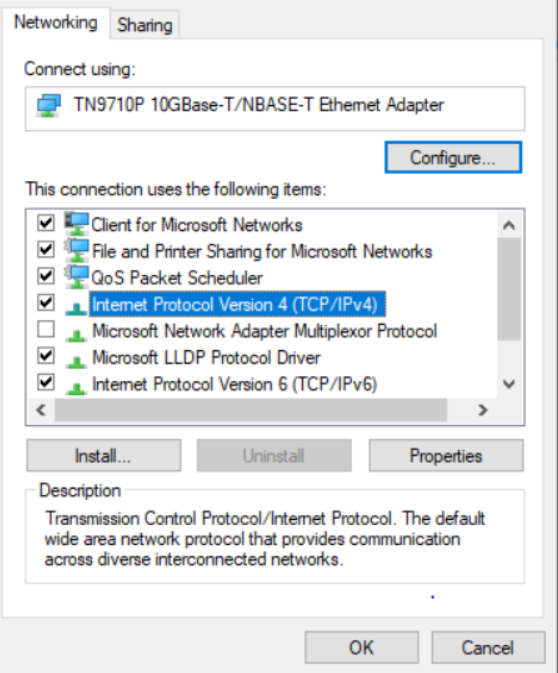
5. Enter Static IP Details:

6. Apply the Changes:
7. Revert to DHCP (if needed):
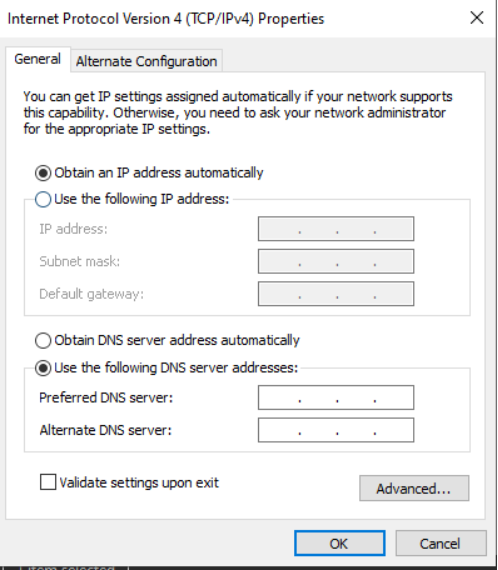
This process will help ensure your device has a consistent IP address, avoiding potential network issues.
No matter what model of iOS device you have, the steps to have a static IP address on your iOS device remain the same. It gives you access to much more reliable access to the server you want.
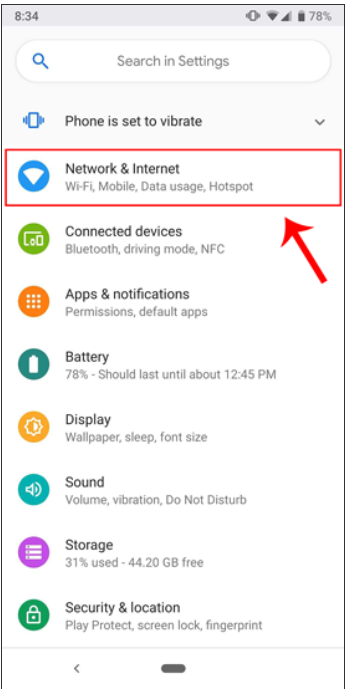
One of the most used operating systems for smartphones around the globe is Android. To set a static IP address on an android system, you just need to follow these six steps.
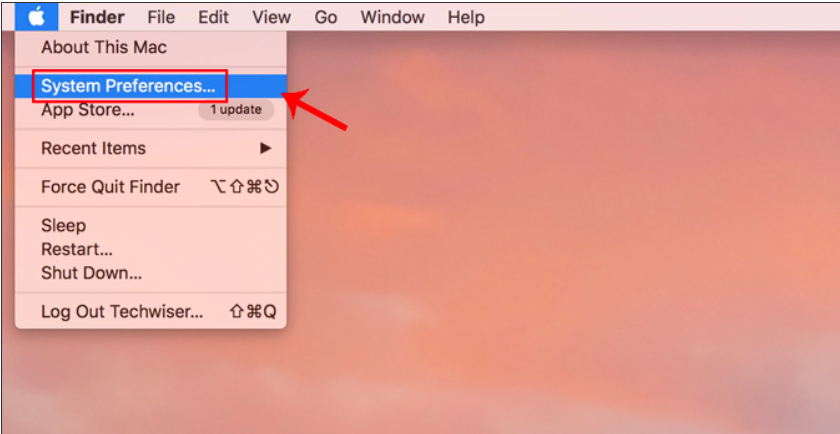
MacOS is a unique OS designed by Apple Inc. with a security system other than Windows, which needs to be purchased separately. Even though that feature was added to macOS, it still threatens network security. Here are the 8 easy steps to set up a static IP on your macOS device.
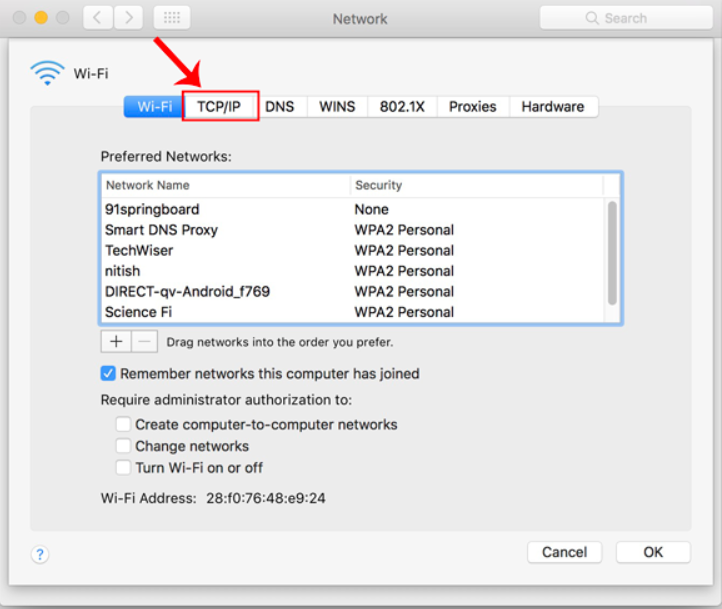
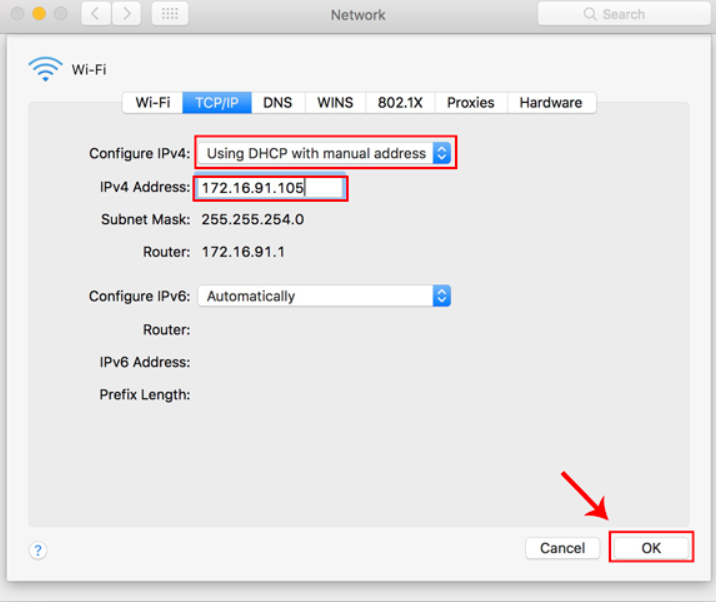
Windows is one of the most used OS around the globe. A Static IP Address for a much more stable and reliable connection can give you peace while surfing on a particular chosen IP. Here are the steps to set your Static IP address on your Windows 10.
A Raspberry Pi is a single-board computer located on a single board. It is a versatile and highly cost-effective system. Below you will find easy steps to learn how to set up a static IP address for the Raspberry Pi.
Note: Make sure to replace “wlan” with your WiFi interface name.
As mentioned earlier, there are several ways to set up a static IP address for your device.
Set a static IP address through your router for a particular device on its network. You’ll need its MAC address for whatever device you want to configure with the static IP address. Additionally, that device has to be connected to the router.
Note: Remember that different router brands have various system operations, so these steps might conflict with yours.
Now you know a static IP and how to set it up on your device. What is your IP address? Go to your device connection setting and tap on the current connection to have a complete view of your IP address. Whether your internet IP address is static or dynamic, your ISP and cybercriminals may still roughly determine where you are and what you're trying to do online. You should protect it from spying eyes no matter what kind of IP address you have. A VPN, like FastestVPN, can aid in preserving your privacy and security. There is only one ideal IP address that works for some. A computer or device should use a static IP address, while a dynamic IP address is preferable. The type of connection will influence whether dynamic or static IP addresses are better for you. While an active IP address is ideal for a home network, a static IP address is more likely to benefit a corporation. A static IP usually costs you more than the usual dynamic one assigned by Internet Service Provider (ISP). It usually costs around $12-$18/per month, and you need to ask your ISP to obtain one to access the appropriate static IP address. There are four types of IP(Internet Protocol) addresses assigned to send and receive information: Public, Private, Static, and Dynamic.FAQs
How to know my IP address?
How can I protect static IP?
Which is the best IP address? Static vs. dynamic
Is a static IP expensive?
How many types of IP addresses are there?
Setting up a static IP address is usually beneficial for businesses hosting their websites and internet service. Most importantly, with the trend of working these days remotely, a static IP works well while logging into work using the best VPN to work Remotely, like FastestVPN, to keep your connection encrypted and secure.
© Copyright 2025 Fastest VPN - All Rights Reserved.


Don’t miss out this deal, it comes with Password Manager FREE of cost.
This website uses cookies so that we can provide you with the best user experience possible. Cookie information is stored in your browser and performs functions such as recognising you when you return to our website and helping our team to understand which sections of the website you find most interesting and useful.
Strictly Necessary Cookie should be enabled at all times so that we can save your preferences for cookie settings.
If you disable this cookie, we will not be able to save your preferences. This means that every time you visit this website you will need to enable or disable cookies again.