
Get 93% OFF on Lifetime
Exclusive Deal
Don’t miss out this deal, it comes with Password Manager FREE of cost.
Have you ever heard about Secure Boot? I am sure you must have, but to add to your knowledge, let me tell you it is a security feature. It aims to stop unauthorized software from entering your PC during startup. Moreover, this feature also ensures that your computer boots up and only uses software that is trusted by its manufacturer. Security Boot is a requirement to upgrade your system to Windows 11. Read below to learn how to enable Secure Boot in your UEFI/BIOS to install Windows 11.

Secure Boot is a security standard made by the UEFI Forum. Its main goal is to make sure that only trusted and signed code runs when your computer starts. This starts with the firmware and goes to the operating system. Secure Boot helps protect your computer from malware and unauthorized software. It checks the digital signatures of the bootloader and operating system. Only trusted and signed parts can run when your computer starts.
To access the BIOS or UEFI settings, restart your computer and press a specific key or a combination of keys when it starts up. The key varies based on your computer’s model and brand, but it’s usually one of these: F1, F2, F10, F12, Del, Esc, or Enter. You may also see a message on the screen telling you which key to press. If you’re not sure, check your computer’s manual or website for the right key. Once you press the key, you’ll enter the BIOS or UEFI settings menu.
Enabling Secure Boot? The steps will differ slightly depending on your device since every BIOS (Basic Input/Output System) is unique. But don’t worry; once you’re inside Windows, the process is identical across the board. The good news is that BIOS settings are pretty similar across different PCs, so you’ll likely recognize the options.
Note: You can also disable Secure Boot following the same method; just toggle it off instead of turning it on.
Once these steps are done, your computer will use Secure Boot to meet Windows/ 10 11 requirements.
If you want to confirm that your Secure Boot is enabled, all you can do is simply open the Start menu and search for System Information. You will now see the System summary section. Just look at the right side for Secure Boot State, and you will see its status, such as on, off, or unsupported.
Secure Boot is unsupported on your PC; when your system’s Secure Boot and TMP mode are turned off, it will show an unsupported error. Besides this, It also happens when your BIOS is set to the legacy mode instead of UEFI mode or when the boot disk is in MBR Mode because the disk should be in GPT mode. Moreover, the unsupported error may also appear in case when your system’s hardware does not support UEFI and Secure Boot Mode.
After looking into all possible causes, I have summarized four effective ways to fix the “Secure Boot is not available” issue. Let’s go through them until the problem is resolved.
You need to enable Secure Boot in the BIOS to install Windows 11 on your computer. Before doing that, check the current state of Secure Boot. Here’s how:
If the Secure Boot status shows “Off,” you’ll need to enable it in the BIOS. Here’s how:
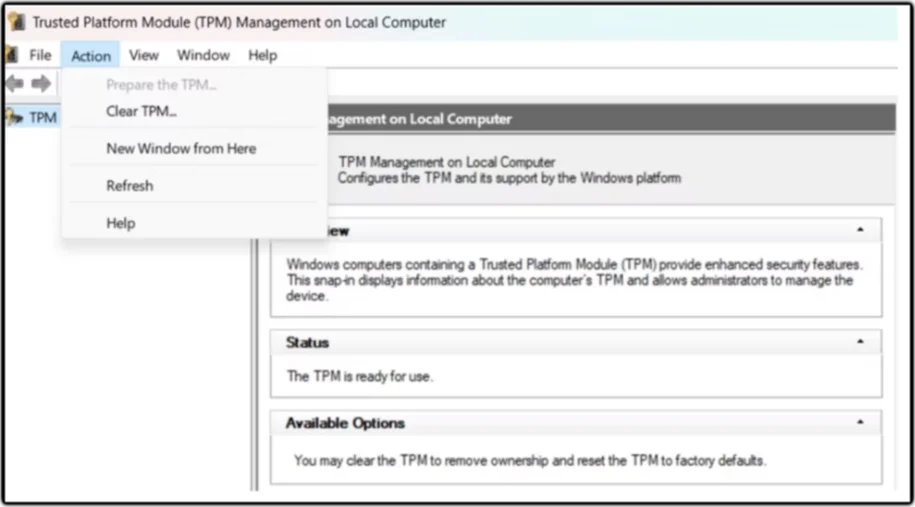
If you wish to download Windows 11, a TPM chip installed on your system is required. In case you don’t have that, you can still install Windows 11, but you will see the “Secure Boot state unsupported” error. The same error will also appear when the TMP is turned off. Here’s how you can enable it:
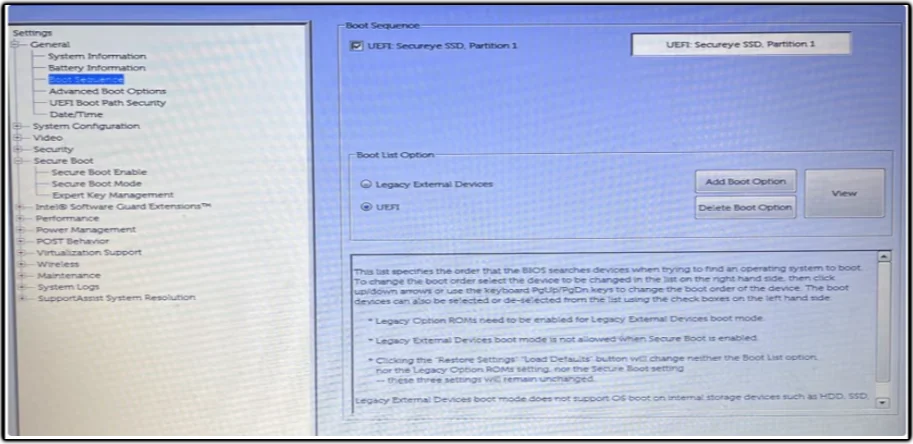
Windows has two BIOS modes: UEFI and Legacy. The main difference is how the firmware locates the boot target. It is recommended to use UEFI mode while installing Windows because it is better in security than Legacy BIOS. To choose UEFI mode, follow these steps:
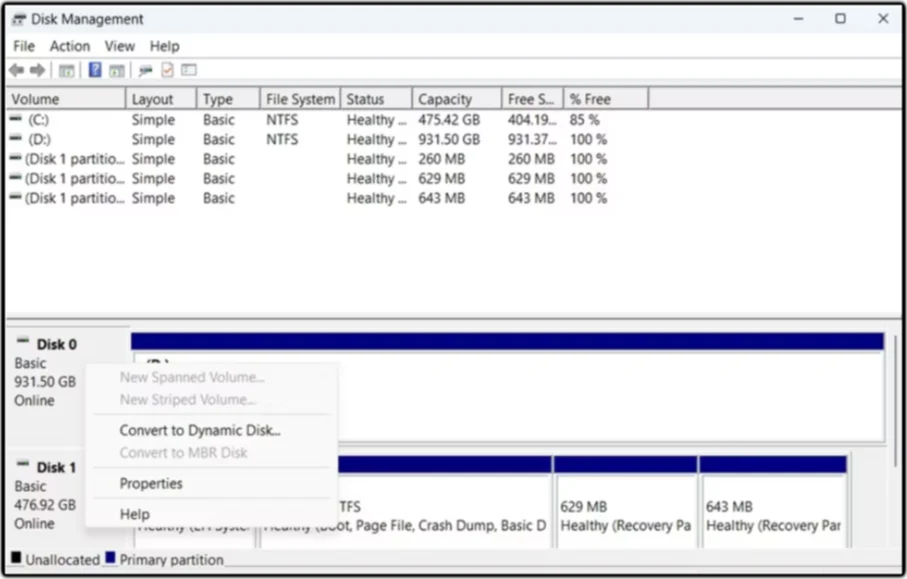
If your computer is set to Legacy Boot mode with MBR partition style, you will see the “Secure Boot state unavailable/unsupported” issue. To fix this, you must convert your boot disk to GPT and enable UEFI.
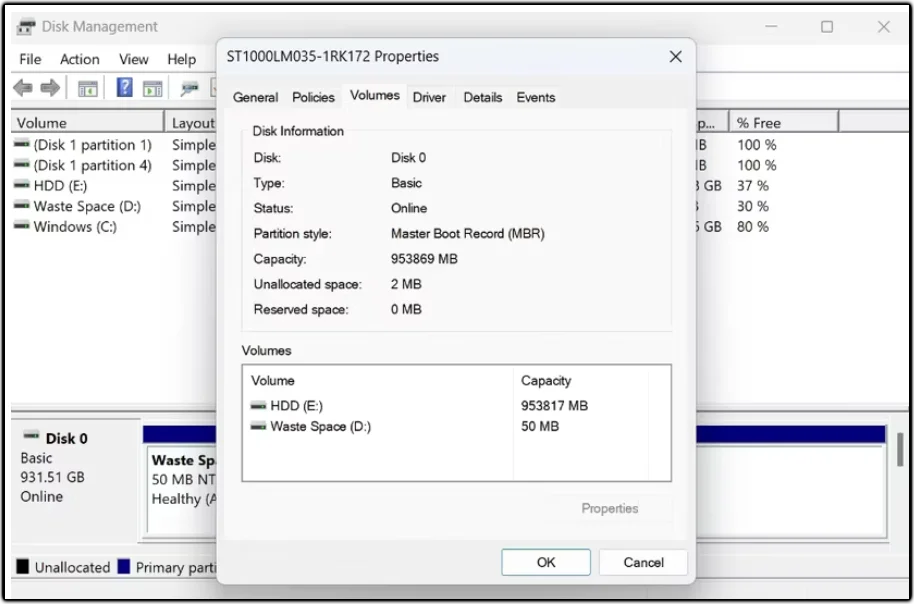
 4. Head to the Volumes tab.
5. Check the Partition style. If it is an MBR, convert it to GPT.
Here’s how you can convert the MBR partition style to GPT:
Now, Windows will begin converting the partition style.
Hopefully, this guide helped you find how to enable Secure Boot in Windows 11. It is mainly a security feature that prevents harmful software from damaging your system when it starts.
Take Control of Your Privacy Today! Unblock websites, access streaming platforms, and bypass ISP monitoring.
Get FastestVPN
© Copyright 2025 Fastest VPN - All Rights Reserved.
Don’t miss out this deal, it comes with Password Manager FREE of cost.