
Get 93% OFF on Lifetime
Exclusive Deal
Don’t miss out this deal, it comes with Password Manager FREE of cost.
Get 93% off on FastestVPN and avail PassHulk Password Manager FREE
Get This Deal Now!By Nick Anderson No Comments 4 minutes
Devices connecting to the internet all require a unique address, which is an IP address. The internet is not one central server sitting in some facility with billions of computers connecting to it every day. It is billions of computers connected to one giant global network. Almost every – if not every – household today has multiple devices, and they all access the internet simultaneously, through a router.

DHCP is part of the process that makes everything run smoothly without manual intervention. It handles the queries of devices asking to connect and use the gateway to access the internet.
Dynamic Host Configuration Protocol (DCHP) is a networking protocol designed to assign IP addresses and other parameters to connecting devices. The dynamic part of DHCP refers to its ability to allocate available IP addresses dynamically.
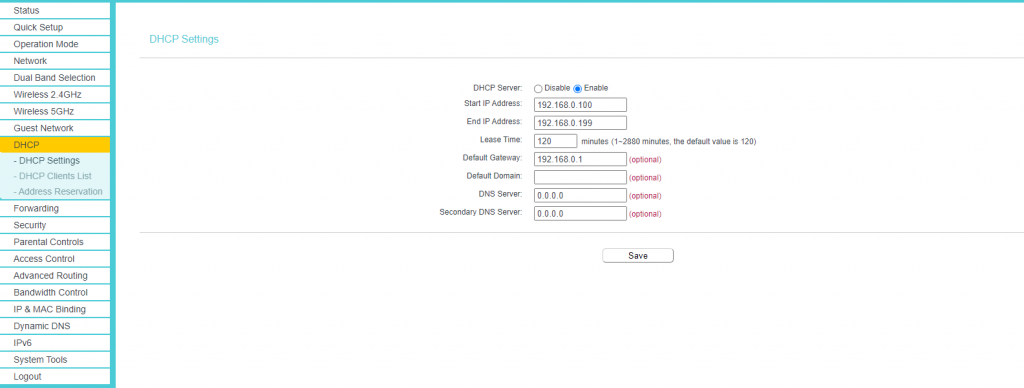
A DHCP server is part of the router that acknowledges the requests coming from devices for an IP address. The DHCP server looks up the parameters, such as the default gateway, DNS server, IP address range, and assigns one within those parameters. It is completely automatic, so a network administrator does not require manual intervention.
Without a DHCP server, the network administrator or the user who has access to the router at home would have to add devices and assign IP addresses manually. The problem with this approach is not only the effort required, but an IP mismatch must also be prevented. An IP address assigned to one device must not conflict with another on the network. Furthermore, as devices retire, the IP addresses have to be freed to make room for new ones. It, however, is not a concern for homes where the number of IP addresses available far outweigh the number of devices present. But, it is a concern for offices and college campuses where new devices are logging in every day.
It’s easy to configure DHCP for home. As a prerequisite, you must have access to the router. If you have a modem, then this method does not apply because modems are incapable of routing functionality. The majority of people use the two terms interchangeably. You can learn about the differences between a modem and a router in our blog here.
It’s unlikely that users today – except for a few – are running a modem with a single ethernet port. Internet Service Providers (ISP) offer devices with both modem and router functionality.
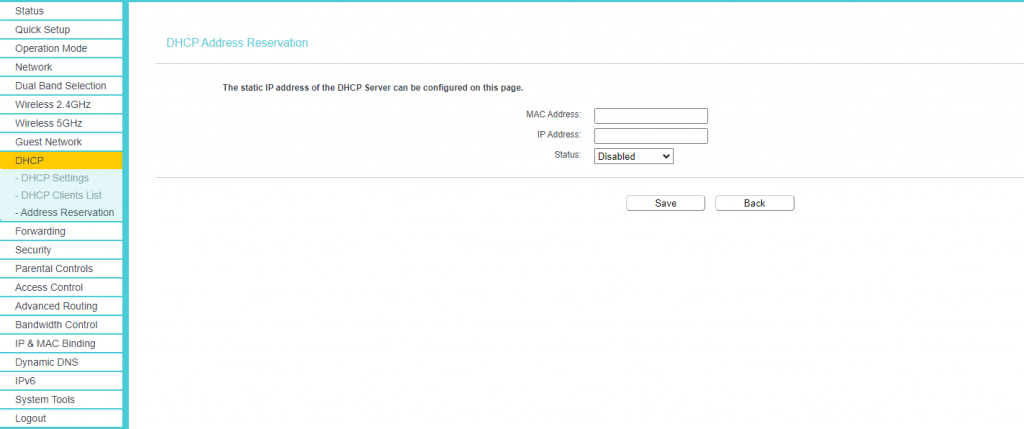
You can easily access the device’s interface for settings such as enabling or disabling a DHCP server, assign static IP for devices, bandwidth control, IP lease control, and more.
Every manufacturer has a different visual interface for their routers, but menus should feel familiar across all of them.

How to Use Static IP Address for Devices

A static IP address is useful if you have IoT devices at home such as surveillance cameras. A static IP address is needed for remote access or for putting a device in the DMZ, such as a video-games console. However, it can also be used for bandwidth control. Internet bandwidth is precious, and bandwidth control is a handy feature if you wish to limit the amount of download/upload speed a device can use of the internet connection.
The device will need to be restarted for changes to take effect.
Conclusion
DHCP is incredibly useful. As a home user, you would want to keep it enabled at all times. Similar to NAT, it’s one of those features that feels invisible, yet has significant importance for a convenient experience.
© Copyright 2025 Fastest VPN - All Rights Reserved.


Don’t miss out this deal, it comes with Password Manager FREE of cost.
This website uses cookies so that we can provide you with the best user experience possible. Cookie information is stored in your browser and performs functions such as recognising you when you return to our website and helping our team to understand which sections of the website you find most interesting and useful.
Strictly Necessary Cookie should be enabled at all times so that we can save your preferences for cookie settings.
If you disable this cookie, we will not be able to save your preferences. This means that every time you visit this website you will need to enable or disable cookies again.