![]()


Get
93% Off!
on Lifetime Exclusive Deal
Don’t Miss out this deal, it comes with Password Manager Free of cost.
If your Facebook is running slow, clearing the cache might help boost the overall app’s performance. You can clear Facebook cache from the settings. Any app, including Facebook, creates temporary files that help the app load faster. This data is called cache; over time, the excess cached data can slow down the app or cause glitches. This blog guides you on clearing the Facebook cache across devices, including Android, iPhone, and Desktop.
Before we jump into the how-to steps, let’s quickly chat about why bothering with a cache clear makes sense. Sure, the cache is there to speed up Facebook by stashing away bits of stuff you’ve already seen—like old photos or page layouts, so it doesn’t have to reload everything from scratch. But when it piles up, it starts causing more headaches than help:
If you’ve ever frantically googled “clear cache Facebook” during a frustrating scroll, trust me, we’ve all been there. It’s one of those simple fixes that keeps your feeds fun and frustration-free.
Clearing your Facebook cache doesn’t delete your account or posts—it just removes temporary files like old thumbnails or post snippets. Your messages, friends, and memories stay safe. After clearing, the app might feel slightly slower as it reloads fresh data, and you may need to log in again if cookies are cleared (rare). It frees up space and fixes bugs, so it’s a safe, reversible tweak to keep things running smoothly.
Android users, this is one of the easiest platforms for a cache cleanup. There are two main ways: through your phone’s settings or right inside the Facebook app. Both take under a minute, and I’ll walk you through them step by step. If you’re typing “clear Facebook cache on Android” into your search bar, here’s your answer.
This clears the app’s stored files without messing with the Facebook app itself—perfect if you just want a quick space saver.
That’s it. You’ve just freed up space without losing your login.
This targets the in-app browser stuff, like saved web pages and media.
![]()
If your app looks different, make sure it’s updated—Facebook tweaks these menus now and then. Either way, your feed will thank you.
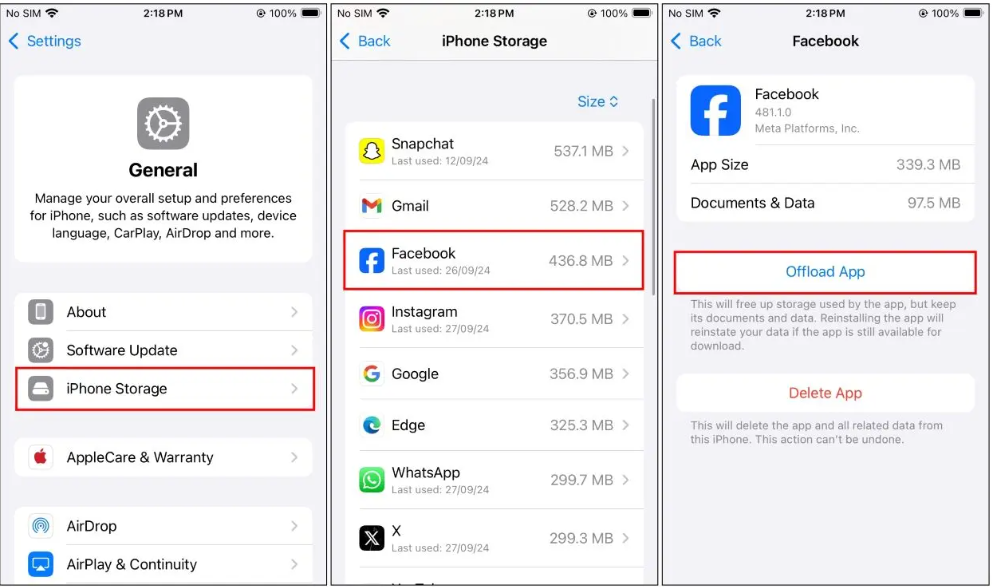
iPhone users, Apple makes it a bit trickier to clear cache directly, since iOS doesn’t have that handy “clear cache” button like Android. But don’t worry; there are solid workarounds for “how to clear Facebook cache on iPhone.” We’ll start with the in-app method (easiest) and fall back to delete-and-reinstall if needed. It’s all low-effort, high-reward.
This zaps the browser cache without touching your whole app.
Your app’s temporary files are gone, and things should load snappier.
If the above doesn’t cut it, or you want a full reset:
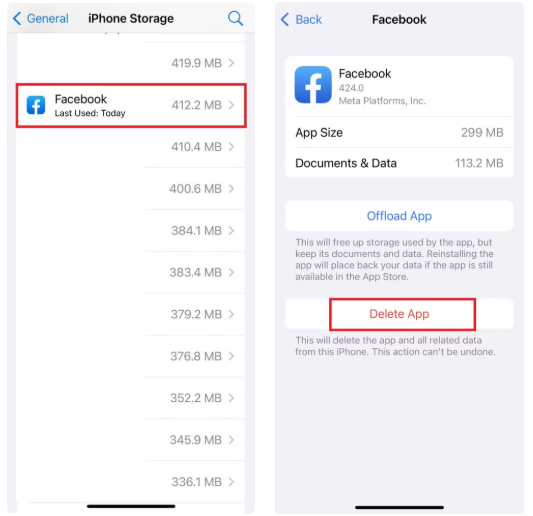
This one’s great for major glitches, like if “clear cache Facebook app” searches led you here after a crash.
Clearing the Facebook cache on your computer is easy if you use the official app for Windows or Mac. It’s like a quick cleanup to fix lag without losing your posts or data. Here’s how:
Your account stays untouched, and the app should run smoothly.
Most of us hit Facebook in a browser on desktop or mobile. “Clear cache on Facebook” here means targeting your browser’s stored data for Facebook.com. It’s universal across Chrome, Safari, Firefox, and Edge—pick your browser and follow these steps.
For a site-specific zap, right-click on facebook.com, inspect element, go to Application tab, and clear site data. But the basic way does the trick for most. Reload Facebook, and it’ll feel brand new—faster tabs, no more ghost images.
Now that you know the how-to, let’s talk about keeping it under control. Managing your Facebook cache isn’t a one-and-done; it’s like a regular habit that prevents headaches.
Cache and cookies sound alike, but they do different things on Facebook. Cache stores stuff like pics and layouts on your device for faster loading—clear it to fix slowdowns without losing anything. Cookies save your login, preferences, or ad data for a personalized experience, but can track you. Clear cache first for app issues; clear cookies if logins are buggy, though you might need to sign in again. Both are safe to clear, but cookies reset more personal settings.
Clearing your Facebook cache is a quick fix to keep your scrolling smooth and lag-free, whether you’re on Android, iPhone, desktop, or a browser. It’s like a mini reset that doesn’t touch your posts or memories, just clears the tech clutter. Make it a habit, and you’ll spend less time frustrated and more time enjoying those likes and laughs. Next time Facebook feels sluggish, give it a try and let me know how it goes!
Take Control of Your Privacy Today! Unblock websites, access streaming platforms, and bypass ISP monitoring.
Get FastestVPN
© Copyright 2026 Fastest VPN - All Rights Reserved.
![]()
Don’t Miss out this deal, it comes with Password Manager Free of cost.